Monday, October 31, 2011

Mummy's Mee Hoon Kuey

There are times that we will miss our mum's cooking (well, unless she is not a good cook) when we are away from home. There will be some dishes that you will put a label on them and named them Mum's signatures. I would call Mee Hoon Kuey as my mum's signature. It is very different from the ones sold in Singapore hawker centres and foodcourts. It is healthier and tastier. And you know that every piece of the dough is handmade uniquely. 


I remember the times which my brother and I kneaded the dough and made them into bite size pieces. We would try to make them into different shapes. Heart, diamond, snake and many more. This added fun when we eat them. 


I guess you can replace the soup with any clear soup. But I really like how this cabbage soup go hand in hand with the 'kuey'. 


Recipe (Serve 4)
Ingredients:
Dough:
  • 500g Plain flour
  • 1 egg
  • 1/2 tsp Salt
  • 1 tbsp Cooking oil
  • Water

Steps:

  1. In a big mixing bowl, mix plain flour with egg and cooking oil. 
  2. Add water 1 tbsp at a time until the sides of the bowl is clean. 
  3. Knead the dough till smooth. 
  4. Cover with cling wrap and let it rest for 30 minutes. 
  5. Boil a pot of water. Let it simmer.
  6. Taking a handful of dough at a time, pinch and stretch bite-sized pieces and drop into the simmering water. Continue with the rest of the dough.
  7. When the pieces floats in the simmer water, it means it is ready to be removed. 
  8. Remove the pieces and soak them in cold tap water. 

Soup:

Ingredients:

Soup:


  • 8 Shrimps, shelled and deveined
  • Pork or chicken slices
  • Half of a small cabbage, sliced
  • 1 clove of Garlic
  • 1 1/2 tbsp Cooking oil
  • 700ml of Water
  • 1 tbsp Soya sauce
  • 1 piece of Chicken flavored cube
  • 1/2 tsp Salt
  • Dash of White pepper
  • Red chillies, sliced 
Steps:
  1. In a heated wok, add cooking oil. 
  2. Fry garlic till fragrant. 
  3. Add in shrimps and pork slices. 
  4. Fry till they turned opaque. 
  5. Add in cabbage. Fry for 30 secs or so. 
  6. Add in water. Let it boil and add in the seasoning. Taste and adjust to your liking. 
  7. Remove the 'kuey' from water and put them into the simmering soup. 
  8. Let it boil for 1 minute. Remove from heat. 
  9. Serve with sliced chilli. 

Friday, October 28, 2011

Crispy Wasabi-Mayo Shrimps with Mango Salsa

Our club just had our second meeting this evening and it is a themed Potluck session. It is titled "Taste the World" and each club members have to bring a self-prepared dish representative of their country. There were about 13 of us who turned up and 8 nationalities were represented.  Cool isn't? I was thinking to myself that no restaurant in this world would be able to serve me such great authentic cuisines from different countries all in one seating. (Ok, forget about those international eat-all-u-can buffet thing!)


We had a little dinner roadmap printed as our place-mat. We could scribble our comments of each dish on it. It was really fun because it is like going through a maze exploring different countries using our taste buds. Many of us were intricate by the spices and ingredients used by different cuisines. 


So what did I bring for the party?
This dish is something I learnt from Chef Sam Leong at his cooking studio. It is fairly simple to make and often loved by most people. Well, except old folks who do not really like mayonnaise. If you do not like wasabi, you can go without too. The mango salsa is a good match for the shrimps as it gives a contrasting taste to tickle your palate and refresh your taste buds for more. 


Recipe 
Ingredients
A) Shrimps

  • 15 - 18 Jumbo shrimps, shelled and deveined
  • 1 Egg white
  • 1/2 Salt
  • 1/4 tbsp Sugar
  • A dash of Sesame oil
  • 2 tsp Corn flour
  • 1 cup Corn flour for coating 
  • Oil for frying
B) Wasabi-Mayo
  • 150g Mayonnaise
  • 25g Condensed milk
  • 15g Wasabi paste
  • 1 piece Fresh lemon, juice
  • Green colouring

Steps:

  1.  Marinate shrimps with egg white, salt, sugar, sesame oil and 2 tsp corn flour for 20 minutes.
  2. Mix mayonnaise, condensed milk, wasabi, lemon juice and green coloring together. Keep in fridge.
  3. Heat saucepan with cooking oil.
  4. Coat shrimps with corn flour lightly and deep fry about 1 minute.
  5. Mix shrimps into wasabi-mayo immediately. Serve immediately


C) Mango Salsa

  • 2 whole mangoes, cut into dices
  • 8-10 mint leaves, chopped
  • 1 shallot, chopped
  • 2 tbsp Thai sweet chilli sauce
Steps:
  1. Mix the ingredients together. 
  2. Before serving, drain the excess water away. 
Serve the shrimps with mango for a heavenly match. I think it will go well with white wine too!

Wednesday, October 26, 2011

Crispy Apple Fritters

Food here is seasonal and it makes me feel that "I better eat as much I can eat now else when season is over there is no more". I guess if I were to choose two food produce to represent autumn in New England, it will be apples and pumpkins/squash. Apples are in abundance now and there are different kinds of apples lined up in all farmers markets. I think an apple phobia may be developing soon. Haha!


Someone said to me that she would recommend anyone who wants to cook apples to bake apple crumble because it is so easy and simple. Well, I want to say I found something easier to make and will definitely put a smile on anyone's face. Yea, apple fritters. 


There are few ways to have it. Coated with cinnamon sugar, drizzled with PURE maple syrup and walnuts or pair with delicious vanilla ice cream. 


Recipe (24 fritters)
Ingredients:
·        2 apples, peeled and cored, cut into 12 slices.
·        1 cup of Plain flour
·        1 tsp of Baking powder
·        1 tbsp of Sugar
·        1/4 tsp of Salt
·        1/4 tsp of Cinnamon powder
·        1 cup of Beer (Or soda water)
·        Cooking oil for frying


Steps:
1.     Mix all the dry ingredients in a big bowl.
2.     Add in beer and whisk to combine.
3.     Heat oil in a large saucepan.
4.     Dip apple slices in batter. Shake off excess batter and fry till golden brown
5.     Drain the fritters from oil with paper towels.


It is fast and tasty so try it!

Thursday, October 20, 2011

Potato and Leek Soup

Everyone has something for soups. Some must have soup everyday to go with their meals, some take it when they feel cold and some take it when they need some comfort. Me? I need soup all the time. I like  soups of all kinds, be it creamy or clear soups.

I just got myself a new toy recently. I have one Singapore, given by by mum. It was so handy that I decided to have one in Boston. It is a handheld blender. It come with attachments that I can used it anyway I want. I really like the stick blender where I can stick it into a pot of delicious cooked ingredients to puree them immediately. I know that chefs use them a lot. I do suggest you go get one too. 


I enjoy going to a couple of farmers markets in Cambridge: Charles square and Central Square. There are a good variety of farmers and food vendors who are really keen in meeting people and selling fresh and good quality produce. As I managed to get some farmers' market fresh potatoes and leeks from Charles Square, Cambridge, I was pretty sure I can going to have some good soup tonight. I always enjoy cooking with and eating fresh farmers' produce because I know I am eating real foods with little or no harmful chemicals and freshly picked in that morning, bursting with colours and flavours. 


I like how potatoes and leeks come together. The earthiness of potatoes well balanced with the mild onion like taste of leeks. It is really tasty. But I added some crispy prosciutto and toasted pine nuts to add some texture to it. 


Recipe (Serves 4)
Ingredients: 

  • 3 Large potatoes, cut into small dices
  • 5 Leeks, white part only, cut into thin slices
  • 1 Shallot, chopped
  • 2 Bay leaves
  • 2 sprigs of Thyme
  • 4 cups of Chicken stock
  • 1/2 cup of White wine
  • 2 tbsp Butter
  • Salt and pepper to taste

 Steps:

  1. Melt butter in a soup pot over medium heat. 
  2. Add in shallots and fry till it turns transparent. 
  3. Add in leeks and fry till fragrance. Then add in potatoes. Stir well. 
  4. Add in white wine, bay leaves and thyme. Simmer for 2 minutes.
  5. Add in chicken soup and simmer till the potatoes are tender. 
  6. Remove from heat. 
  7. Remove bay leaves and thyme from soup. 
  8. Puree with a hand-stick blender. Make sure the soup turns smooth.  
  9. Return to heat. Add salt and pepper to taste.
  10. Enjoy!

Monday, October 17, 2011

Crispy Yummy Roti Prata

Oh boy.... I miss Roti Prata so much. I miss the strong aroma and its "crispy on the outside and tender on the inside" texture. It is so unforgettable. Oh no... The sinful Singapore Indian pancake is calling out to me,"Yummy yummy, make me to eat!" 

Okay, I surrender! I gave in to the temptation the calling of the crispy layered pancake and lets make some Crispy Yummy Roti Prata!


 I am sure the dough is not too difficult to make but I do not think my arms are comparable to those muscular, hairy and skillful prata flippers of Jalan Kayu or Defu Lane. Hence, I will not try to tell you how to flip because I did not and dare not. It will be hilarious to see pratas stuck on the walls of my kitchenette. 

Recipe (makes 12 Pratas)
 Ingredients:
  • 600g of Plain flour
  • 300ml of water
  • 1 Egg
  • 15ml of Cooking oil
  • 1tsp of Salt
  • 1 tbsp Sugar
  • Cooking oil for frying
Steps:
  1. Mix water, egg, salt, sugar and oil together in a bowl. 
  2. In a mixing bowl, put flour in and make a well in the centre.
  3. Slowly, incorporate the liquid mixture into flour by adding liquid mixture into the well and using fingers to mix the flour into the well. 
  4. It should form into a sticky dough. Continue to knead till smooth. About 5 minutes. 
  5. Using a cling wrap, wrap it and put aside for 30 minutes. 
  6. Remove wrap, knead another 10 minutes. 
  7. Make the dough into smaller portions of 80g each. 
  8. Coat with cooking oil and put into a tray. Wrap with cling wrap. 
  9. Leave overnight. 
  10. Heat the frying pan on medium heat and add 2 tbsp of oil. 
  11. Flatten a ball at a time, stretch the dough till translucent thin. (You can try to flip here) 
  12. Roll the dough into a scroll and roll the scroll into "curl up worm".
  13. Then flatten it with your palm. 
  14. Pan-fry it till both sides are crispy and golden brown. 
  15. Serve with curry or sugar. 

Friday, October 14, 2011

Rice Pudding in Caramel Apple Sauce

I think I am an Activist. I like to make things happen. I like to help and make things better. Hmm... 


Recently, I initiated a Culinary club in my residential community and volunteered to coordinate it. It is so great to be able to start a club to gather like-minded people (Foodies) together and I hope that through this club, people of different backgrounds and cultures can come together to build a community who loves and appreciate food. 


During my planning process for the culinary club's inaugural session, I researched on some 'apples' dessert recipes as I would like to demonstrate a couple of recipes during the kickoff session. The recipes have to be good as you know...First impression counts. And everyone loves desserts! 


When I tried this recipe, I fell in love with the vanilla rice pudding immediately. "Oh my gosh! It is so creamy and yummy!"  I think I can eat this pudding all day and night, for breakfast, lunch and dinner. Okay, I am exaggerating but I really love it. The caramel apple sauce is nice too but I think if you have your grandma's hand-down recipe, you can always use that. 


So today, I did the demonstration. It went great and everyone loves it! 


Recipe (6 servings)
Ingredients:
Pudding:
  • 3 cups of Water
  • 1/4 tsp of Salt
  • 1/2 cup of Rice
  • 4 cups of Whole milk
  • 1/3 cup of Sugar
  • 2 tsp of Vanilla extract

Steps:
1.     In a saucepan, boil 3 cups of water, salt and rice for 10 minutes.
2.     Drain rice and discard cooking water.
3.     In the same saucepan, boil milk and sugar over medium high. Stir until the sugar dissolves.
4.     Add rice and reduce heat to medium. Simmer until the rice is tender and pudding turns creamy and thickened.
5.     Remove from heat.
6.     Stir in vanilla extract.
7.     Transfer pudding to a shallow bowl. Wrap with plastic wrap and refrigerate until cold.

Ingredients:
Caramel apple sauce:
  • 2 medium apples, peeled and cut into ½ inch size
  •  1/4 cup of Sugar
  • 1 tbsp of Lemon juice
  • 1 tbsp of Unsalted butter
  •  1/2 cup of Apple cider
  • A pinch of salt
  •  1/2 cup of Heavy cream
  • 1 – 2 tsp of Rum (optional)


Steps:
1.     Using a saucepan, mix sugar and lemon juice together.
2.     Over medium high heat, caramelise sugar until it is medium amber colour.  Stir well.
3.     Remove from heat. Add butter and mix well.
4.     Return to heat and add in apple cider and salt. Bring to boil.
5.     Add in apples and simmer until tender. Stir occasionally.
6.     Add in heavy cream and boil until sauce thickens slightly.
7.     Add in rum and stir well. Boil for 1 minute.
8.     Remove from heat.


Serving instructions:
·        Using lowball glasses, top warm caramel apple sauce with cold rice pudding. Add another spoon of warm caramel apple sauce.
·        Garnish with whipped cream.

Wednesday, October 12, 2011

My Favourite Meyer Lemon Tart

I was searching for a lemon tart recipe online and chanced upon a recipe that asked for Meyer Lemons. What's Meyer lemons? I have never heard about them before. I googled and found out that they are actually a cross between lemons and mandarin oranges. And they actually taste so. Amazing! I have also observed that Meyer lemons are slightly rounder, smoother and more orangy in colour.


Oh... for my Singaporean readers, the wooden juicer you see on the picture is really a great buy. I tried to look for it in Singapore at various places and failed to find one. I was elated to get it in Cambridge, Porter Square. Just for less than $3 USD. I simply love it. It is so easy to juice citrus fruits now. 


This recipe is a keeper. The crust is amazingly crunchy and buttery. I love it so much. I gave one to a friend and served one when my brother and his wife came to visit me. Marvelous feedback! I do hope you try. If you do not have Meyer lemons, you can always use ordinary lemons. 


Recipe ( Four 5" tarts) Adapted from Foodnetwork.com
Ingredients:
Crust: 

  • 1/2 cup Cold butter, cut into small pieces
  • 1/4 cup Sugar
  • 1 1/4 cup Plain flour
  • 1 Egg yolk
  • A pinch of salt
  • 2 tbsp cold water

Steps:

  1. Mix all ingredients (except for cold water) in a food processor.You can opt to rub the butter into the dry ingredients. 
  2. Using hands to gather the dough. Add a little of water at a time to help the dough come together. 
  3. Knead a couple of times on a lightly floured surface. Wrap it with cling wrap and refrigerate for about 30 minutes. 
  4. Preheat the oven to 220 degree Celsius (425 F). 
  5. On a lightly floured surface, roll the dough into 3mm thick. Lay it over the tart pans. Remove excess dough and poke the dough in the tart pan with a fork a couple of times. This will help to prevent air bubbles forming in tart shells during baking. 
  6.  Cover the edges with aluminium foil to prevent burning. 
  7. Bake for 12 minutes. Remove the foil and bake for another 3 minutes. 
  8. Remove from oven. It should be light golden brown. 
Filling:
  • 3/4 cup Meyer lemon juice (approx 3 lemons)
  • 3 Meyer lemons, zested
  • 1 1/3 cups sugar
  • 5 eggs
  • A pinch salt
  • 3/4 cup butter, cut into cubes
Steps:
  1. Preheat the oven to 150 degree Celsius (300 F).
  2. In a saucepan, mix juice, zest, sugar, eggs and salt using a whisk. 
  3. Bring to a boil using medium heat. Keep whisking to prevent the lumps from forming. 
  4. When it boils, remove from heat and add in butter slowly. Stir at the same time. 
  5. It should have a smooth consistency. 
  6. Pour it into the tart shells. 
  7. Bake for 15 minutes. The curd should set.
  8. Remove from heat and cool it for 30 minutes before serving. 
  9. You may serve with vanilla ice cream or whipped cream with berries. 

Friday, October 7, 2011

Authentic Thousand Island Dressing

I am embarrassed to say I have been buying salad dressing off the racks. I never had the courage to mix condiments together to make a sauce for my salad. I worry about fuss, storage and most importantly taste. 


I was at Boston Adult Learning Centre last week for a weekend basic cooking class. I was hoping to learn some cooking techniques so I can established some theoretical understanding to improve my culinary skills. I did not leave the class with what I aimed to achieve but I have gotten some good recipes.  We made some Thousand Island dressing in the class. It was meant for the sandwiches which the instructor has demonstrated. I was already quite filled after sampling few dishes and never imagined that the sandwiches would be so delicious. It was made on an iron-cast pan, pan-fried with butter. The sandwiches were made with rye bread, cheese, roasted beef, cheese, cabbage slaw and thousand island dressing. Yummy! 


So I went back home and made some Thousand Island dressing for the baby carrots we got. The dressing was a marvellous dip! The great thing about making your own sauce is that you can look for low fat ingredients to manage your fat intake. 


And do you know that Thousand Island Dressing originated in United States?


Recipe
Ingredients:
1 1/2 cups Mayonnaise (You can opt for low fat mayo)
1 cup Tomato Ketchup
1 tsp Chili sauce
2 tsp Worcestershire Sauce
A pinch of Salt


Steps:

  1. Mix all the ingredients together. 
  2. Enjoy with your favourite greens!

Wednesday, October 5, 2011

Heartwarming Fish and Shrimp Soup

The nights in Cambridge are turning pretty cold. It will be really nice to snuggle in couch with a heartwarming soup (in a cup) in my hands. I have been wondering if I am already trying to keep myself warm in Autumn, how am I going to survive winter? Now I understand why everyone has been telling me about Boston's infamous harsh Winter. I doubt I am ready for that. 


Last week after cleaning my CSA's pollock, I made fish stock with the fish bones. As I am not a skilled fishmonger, there was quite an amount of fish meat on the bones. It will be such a waste to throw them away. The fish stock was amazingly sweet. I love it when fish is so fresh and you can taste the sea! I also have couple of Pollock fillets in my freezer waiting for me to eat them. So here it is: Fish soup... But I really like shrimps too. So Fish and Shrimp soup it is!


Recipe (4 servings)
Ingredients:

  • 1/2 medium yellow onion, cut into small dices
  • 1/2 stalk of Celery, cut into small dices
  • 1/2 small carrot, cut into small dices
  • 1 medium potato, cut into small dices
  • 6-8 medium sized shrimps, shelled and deveined
  • 600g White Fish (1.3 lbs), cut into 1 inch x 1/2 inch
  • 1 Bay leaf
  • 3 tbsp Butter
  • 3 tbsp Plain flour
  • 3 cups Fish stock (*instructions after recipe)
  • 1/2 cup Heavy cream
  • 1/8 tsp Paprika 
  • Salt and Pepper to taste
  • Roasted pine nuts (*optional)
Steps:
  1. In a pot over medium heat, add butter. Melt it. 
  2. Add onions and fry till translucent. Add in carrots and celery. 
  3. Fry until vegetables began to soften. 
  4. Add in flour to make a roux. Stir for at least 5 minute to get rid of the raw flour taste. Do not brown the roux.
  5. Add in the fish stock slowly. Stir well. 
  6. Let it simmer for 10 minutes. 
  7. Add in heavy cream and simmer for another 10 minutes. 
  8. Add in fish and shrimps. 
  9. Season with salt, pepper and paprika. Simmer for another 5 minutes. 
  10. Serve hot with roasted pine nuts. 

Fish Stock
Ingredients:

  • 1/2 medium yellow onion, cut into small dices
  • 1 stalk of Celery, cut into small dices
  • 1 small carrot, cut into small dices
  • 2-3 pounds of fish bones 
  • 1/2 cup dry white wine 
  • 5 cups water
  • 2 tbsp butter
  • 3 sprigs of Thyme
  • 2 bay leaves

Steps:

  1. In a pot over medium heat, add butter. Melt it. 
  2. Add in all vegetables. Fry till it begins to soften. 
  3. Add in fish bones. Fry till it turns opaque. 
  4. Add wine. 
  5. Add in bay leaves and thyme. Simmer for 3 minutes to let the alcohol evaporates. 
  6. Add in water. Cover the pot with a lid and let it simmer for 30 minutes.
  7. Remove from heat. Drain the stock. 
  8. If you are not using it immediately, freeze it.  


Monday, October 3, 2011

Singapore Street Food: Chwee Kueh / Kuih

Some food are taken for granted. Especially streets food. I think perhaps it is because they are so easily gotten and hence so easily forgotten. It is when you are away from home and street foods get craved and longed for. 


For those staying in Singapore and been to Singapore would have dined in Hawker centres, coffee shops and food courts before. One of the most popular breakfast food is Chwee Kueh. These delicacies are reasonably cheap and commonly found. I guess that is also a reason not to cook your own Chwee kueh at home.  


I think the secret to a Chwee kueh has to satisfy two key gastronomic qualities. 
  1. Soft but chewy texture of Kueh (dough)
  2. Tasty and fragrant chai poh (preserved radish)
Well, this recipe is marvelous and good enough for Singaporeans to quit queuing for Tiong Bahru Chwee Kueh!


Recipe (18 small moulds) 
Ingredients:
Topping:
200g Chai Poh (Preserved Salted Radish)
1 tsp Sugar
1 tsp Roasted sesame seeds
1 clove Garlic, chopped
1 clove Shallots, chopped
1/2 tsp Sesame oil 
2 tbsp Cooking oil


Steps:

  1. Soak the Chai Poh for 15 minutes. 
  2. Rinse it twice to get rid of most of the salt. (But do not get rid of all the salt, trust me you want them). Then drain dry. 
  3. In a heated saucepan, add in cooking oil. Add in garlic and shallots. Fry them till light golden brown. 
  4. In medium low heat, add in Chai Poh. Fry well.
  5. Add in sugar and sesame seeds. 
  6. Simmer the chai poh till it starts to brown. It probably takes 15 - 20 minutes.
  7. Add in sesame oil. 
  8. Remove from heat. 

Kueh:
1 cup Rice flour
2 1/4 cup of water
1 tbsp cornflour
1 tsp cooking oil 
1 tsp salt


Steps:

  1. Mix rice flour, corn flour and salt in a mixing bowl. 
  2. Add water and oil. Mix well.
  3. Pour mixture in a clean saucepan. 
  4. Over medium low heat, cook the mixture till it thickens and cleans the sides of the saucepan. You will have to keep stirring during the process as it may get lumpy. 
  5. Remove from heat. 
  6. Spoon the mixture into small molds. 
  7. Steam the moulds over high heat for about 15 minutes. 
For serving, remove the kuehs from molds with a butter knife (or something similar). Top the kuehs with prepared chai poh. 

If you are not consuming it immediately. You may remove all the kuehs and put them on a plate covered with cellophane wrap. And refrigerate them. Steam for 8 minutes before consumption. 


Saturday, October 1, 2011

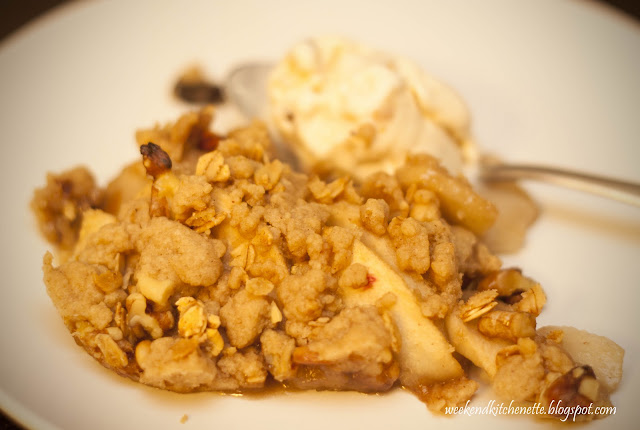
Gorgeous Cinnamon Apple Crisp / Crumble

Last weekend, my hubby and I joined the Apple Picking trip organised by the residence committee. It was so fun to be able to pick your own apples. As a tropical gal from Singapore, apples are imported. As ignorant as I can be, I was ill-informed about the different types of apples and how they tasted differently. In the apple farm, there were several varieties of apples. There were Delicious, Cortland, McIntosh and Empire. It was quite an experience to pluck and taste the apples fresh off the trees. 


We were told that the sweetest and reddest apples are at the top of the tree. There were ladders around for us to hunt for the best apples. After tasting all the different types of apples, we like Delicious more. It is the sweetest. The others are little tart. Nevertheless, we got a little of everything. Oh no... my refrigerator is going to be packed with apples. 

I want to make apple dessert and didn't want to spend too much time making dough for a tart so Apple Crisp it is! Well, some people call it Apple crumble too. 


Recipe (8" x 8" tray) Good for 5 servings
Ingredients:
Filling:
  • 2 Big Red apples (I chose Empire), thinly sliced
  • 1/4 cup walnuts, chopped
  • 1/4 cup brown sugar
  • 2 tbsp plain flour
  • 1 tbsp maple syrup
  • 1 tbsp lemon juice
  • 1/8 tsp cinnamon powder
  • 1 pinch nutmeg powder

Topping:
  • 1/4 cup plain flour
  • 1/4 cup brown sugar
  • 1 pinch cinnamon powder
  • 1/8 tsp salt
  • 4 tbsp cold butter, cut into small pieces
  • 1/4 cup walnuts, chopped
  • 1/4 cup granola (optional)

Steps:
  1. Preheat the over to 180 degree Celsius/ 350 degree Fahrenheit. 
  2. Mix the ingredients for the filling in a big mixing bowl. 
  3. Place the mixed ingredients in a 8"x8" baking tray.
  4. In a clean mixing bowl, mix flour, brown sugar, cinnamon powder and salt. 
  5. Add in the cut butter. 
  6. Rub the butter into the dry ingredients such that you get pea size lumps. 
  7. Add in chopped walnuts and granola. Mix lightly. 
  8. Sprinkle over the filling. 
  9. Bake for about 35 minutes. 
  10. Cool for 10 minutes before serving. 
  11. Best served with vanilla ice-cream.