Showing posts with label Desserts. Show all posts

Monday, August 12, 2013

Carrot Cake is baked

Yes, this carrot cake is baked. It is a cake with carrots. I am still trying to get over it.  I didn't quite like carrot cakes because I was simply confused with Asian savory carrot cakes. Rooted to my asian roots, I was unwillingly to have  different items sharing a name. It is a identity crisis! Also I have never baked a cake with vegetables in it. I have tried nuts, fruits and herbs but never with a vegetable. It is weird... But it is a psychological issue I have to deal with. So here it is!

As I was writing this post, I googled for the history of carrot cake. I was surprised that it started long ago in the medieval days where it was cheaper to use carrot as natural sweetener in cakes. Perhaps that's why we have sweet potato pie? However it was only in 1960s where the Americans came up with the American Carrot cakes. 


Recipe For about 10 cup cakes

Ingredients
  • 2 large eggs
  • 1 cup brown sugar
  • 3/4 cup Canola oil 
  • 3 tablespoon Buttermilk
  • 1 teaspoon Vanilla essence
  • 1 cup + 2 tbsp All purpose flour
  • 1/2 tsp Baking powder
  • 1/2 tsp Baking soda
  • 1/2 tsp Kosher Salt 
  • 1/2 tsp Ground Cinnamon
  • 1/4 tsp Ground Ginger
  • 2 cups Tightly packed shredded Carrots
  • 1/2 cup Raisins
  • 1/2 cup Walnuts, toasted and chopped

Steps:

  1. Preheat the oven to 180 degree Celsius. 
  2. Using a cake mixer, whip the eggs and brown sugar at medium until mixture is light and thick. 
  3. In a separate bowl, mix oil, buttermilk and vanilla. Set aside.
  4. In a separate bowl, mix all the dry ingredients together.  Set aside.
  5. Reduce speed of cake mixer to low and slowly add in the oil mixture. 
  6. Using a rubber spatula and fold in the flour mixture. 
  7. Add in carrots, raisins and walnuts. Fold in until the batter is well mixed. 
  8. Pour the batter into a baking tin or muffin cups.
  9. Bake the cake for 1 hour or 45 minutes respectively. 


Saturday, April 27, 2013

Asian Fried Mashed Bananas Fritters (Goreng Klodok)

I am going to visit my hairdressers today, not for a hair cut but to visit them as long time friends. It was about ten years ago when I lost control of my unruly hair (there was no rebonding technology then), I met Ethel and Terri. They are two of the most amazing women I have ever met so far. Every time I visit them, it  is like going to my third place where I feel welcomed, loved and happy. Ethel and Terri treat me like their own daughter and they would share with me their life experiences and even till today they would contact me once a while to make sure I am well. Although I do not visit them as often as I would like to, the bond we share is still fresh and strong. One of the interest we shared is the love for food. As Terri said," We shall eat first then work on it later." I totally agree with her. So today, I would like to bring something sweet for them for tea, something from my heart.  

Goreng Klodok is a typical Singaporean finger food that can be found at many Malay food stalls. It is getting difficult to find good ones nowadays. The ideal fritters should be packed with bananas, light in the inside and crispy on the outside. In my attempt in making these, I have also added brown sugar to add a depth of flavour to the sweetness and rice flour for the crunch.  


Recipe (24 pieces) 
Ingredients:
  • 500g Ripe bananas
  • 80g Caster sugar
  • 20g Brown Sugar
  • 120 All Purpose Flour
  • 2 tsp Rice Flour 
  • 1 tsp Baking Powder
  • 1/2 tsp Salt
  • 60 ml Water
  • 2 tsp Oil 
  • Oil for frying

Steps:
  1. Mash the bananas with a whisk/ fork. We still want some bits of bananas in the mash to have the bite in the fritters. 
  2. Mix in the sugars.
  3. Add in the flours and baking powder. Mix well. 
  4. Add in salt and water. Then lastly the oil. 
  5. Set aside for at least 5 minutes. Prepare for oil for deep frying. I used a small saucepan with 2 inch of oil. Drop a small dough to check for temperature. It should sizzle quickly. If the temperature is too low, dough may absorb too much oil and end up with greasy balls. 
  6. Spoon 1 tablespoon of batter into the hot oil. The dough should float up shortly. Make sure both sides are brown before removing from oil. 


I am very happy that Ethel and Terri loved my "heartwork". The fritters were snapped up so quickly. :P  This made my day and I am sure it brightened theirs too. If you are reading my blog, please join me in making someone's day different. Cook for them...  

Saturday, March 9, 2013

Kaya Glutinous Rice cake (Kueh Seri Kaya)

When I was young, my parents would sometimes drive by Katong to pick up some nyonya kuehs for breakfast for the next day. I was not a BIG fan of the asian sweet cakes but there are a few types I adore. In fact, my family members have their own personal favourite. And mine? Kueh Seri Kaya!


Most nyonya kuehs are made from eggs, coconut milk, flour, asian herbs and some use root vegetables like tapioca and yams or in this case, rice. These ingredients are easily available in Asia and they are relatively cheap. The preparation is easy and does not require much whipping or beating. 


Recipe (12 cm round tray)
Ingredients:

A) Rice (base)

  • 600g glutinous rice, washed once and soaked for 4 hours
  • 1 & 1/2 tsp Salt 
  • 250 ml Coconut milk
  • 125 ml Coconut milk + 125 ml water
  • 3 pieces of Pandan Leaves
Steps:
  1. Drained the glutinous rice. Lay the rice into a 12-cm round tray and steam the rice for 10 minutes. 
  2. Dissolve salt in 60 ml Coconut milk + 60 ml water mixture. Mix into the glutinous rice. 
  3. When it is mixed well, add in the rest of the coconut milk. 
  4. Lay the pandan leaves on top of rice.
  5. Steam for another 30 minutes. 


b) Kaya
  • 35g Plain Flour
  • 240ml Coconut milk 
  • 60 ml Coconut milk + 60 ml water
  • 10 eggs 
  • 230g Caster Sugar
  • 1/4 tsp Salt 
  • 2 Pandan leaves, tie into a knot
  • 120ml Pandan juice, pound the 10 pandan leaves and add 2 tbsp of water
  • 1/2 tsp Green colouring 

Steps:
  1. Mix plain flour with 60 ml Coconut milk + 60 ml water. Set aside.
  2. Mix the eggs in a bowl and strain it through a strainer. 
  3. In a metal mixing bowl or a heat proof glass mixing bowl, mix the eggs with sugar, salt and pandan leaves. 
  4. Add in the coconut milk, pandan juice, colouring and flour mixture. Mix well. 
  5. Put the mixing bowl over a pot of simmering water, double boil it. 
  6. Stir continuously until the kaya thickens and coats the back of a wooden spatula. 
  7. Discard the pandan leaves. 

8. Pour the kaya over the just steamed glutinous rice. 
9. Steam it for 30 minutes. 


10. Set aside 4 hours. Cut and serve!  


I like how this recipe turned out. Very authentic and original! My mum came over and had 3 pieces at one shot! That speaks for itself!
Cheers!

Saturday, October 13, 2012

Coconut and Mango Friands

Hi friends, let's have friands! What are friands? This is my first time to get to know about friands and of course needless to say it is also my first time baking them. After tasting it, I am very  impressed. 


Friands means dainty or a gourmet who delights in delicate tastes (wikipedia). In addition to my internet search, friand is a spin off from financier which uses almond flour, butter and egg whites as key ingredients. However, friands, popular in Australia, has additional flavouring like coconut, fruits, chocolate and nuts. The rich and buttery cake amazes the tastebuds on the first bite and your mind will beg for for.. This 'phenomenon' is universal! My in-laws witnessed it too! 

Coconut & Mango Friands (12 portions)
Ingredients:

  • 125g All-purpose flour
  • 300 pure icing sugar
  • 1 tsp Baking powder
  • 65g Desiccated coconut 
  • 90g Almond meal
  • Grated zest of 1 lemon 
  • 8 Egg whites
  • 250g Unsalted butter, melted and cooled
  • 1 mango, chopped to make 1 cup 
Steps:
  1. Preheat oven to 180 degree celsius. 
  2. Sift flour, icing sugar and baking powder into a large bowl. 
  3. Stir in coconut, almond meal and lemon zest. 
  4. Lightly forth egg whites with a fork. Add to dry ingredients with melted butter. Beat with a spatula. 
  5. Fill the friands tray with batter to 3/4 mark. Top with mango.
  6. Bake for 15-20 minutes. Check with a skewer inserted into the centre and comes out clean.
  7. Serve well with a dash of icing sugar. 

Tuesday, August 14, 2012

Natural Pandan Chiffon Cake

It was for the longest time I have never cooked with fresh pandan leaves. Let alone tasting pandan flavored dishes. It was because the tropical plant does not grow in US and I could only get hold of frozen leaves and flavor essence in  the Asia supermarkets. But none of these could duplicate the distinctive taste and fragrance of fresh pandan leaves. 

My one-year stay in Boston has given me many insights into the American cuisine and delicacies. There were occasions which I assimilated food of the West with my prior knowledge of the East. The commonly known chiffon cake is more commonly known as Angel cake in US. It is named because of it's lightness that was referred for the angels.The lightness is achieved by whisking the egg whites and sugar till stiff peaks are formed. 

Now I am back in Singapore, I get to access my well-equipped kitchen and use many tropical ingredients easily. During this baking session, I deliberately left out artificial colouring. I wanted the natural colour and flavor of fresh pandan leaves hence you can see the light tone of green with a strong influence of brown on the cake. However to have a more appetizing color, green food coloring is commonly used. 


But whenever I savor pandan chiffon cakes, it brings me back into memories more than twenty years ago. Then, my brother and I would compress the cake slices into small round balls and popped in them into our mouths. The balls were packed with coconut and pandan flavor, unlike the lightly and airy chiffon cake. 

Recipe:
Ingredients

  • 8 egg yolks
  • 120ml Coconut milk
  • 1 tsp Juice of 8 Pandan leaves
  • 150g All-purpose Flour
  • 1 tsp Baking Powder
  • 1/2 tsp salt
  • 100ml Canola oil
  • 8 Egg White
  • 180g Fine Sugar
  • Green colouring (optional)
Steps:
  1. Preheat the oven to 165 degrees Celsius.
  2. Mix egg yolks, coconut milk, flour, baking powder and canola oil in a mixing bowl and set aside. 
  3. Whisk egg white and sugar till stiff peaks are formed. 
  4. Fold in the egg yolks mixture. 
  5. Pour the mixture in greased 11-12" chiffon cake tin (removable base). 
  6. Bake for 35 minutes.
  7. When removed from oven, invert the cake tin and let the cake cool. 


Sunday, May 27, 2012

Strawberry Heart Cheesecake Squares

I have made these dainty Strawberry Heart Cheesecake Squares a couple of months back but haven't had the chance to post it up. I wanted to make these again as they do not look camera prefect but it tasted pretty good. It would have been better if I have the right tools and jello powder. 


This no-bake cheescake was very popular in Singapore for some time and it was only available through home bakers. I guess it is easy to do and pretty to sell. :P I am sure we all can make these to impress your family, friends and neighbours. 


I wish I bought a better jello. As I got a vegan/ organic version of jello powder (from Whole Foods), it gave a translucent and blurred look rather than a transparent one. 


If you have noticed the blue dish I have used here to hold the cheese cake, it is made by yours truly "ME". It is one of my ceramic pieces which I  made during my wheel-throwing beginner class in MIT. I like the shape and colour of this dish and made several other pieces with the same colour too. :) 


Recipe (12 pieces)
Ingredients:
A) Base
  • 120g Digestive Biscuits, crushed into fine crumbs
  • 40g melted butter
Steps:
  1. Mix the biscuit crumbs with melted butter.
  2. Using a fork, press onto a rectangular baking tray. 
  3. Refrigerate for at least 30 minutes before use. 

B) Filling
  • 250g Cream Cheese, soften to room temperature
  • 50g Confectioner's sugar
  • 1 tbsp Gelatin Powder
  • 40ml Boiling water
  • 1 tsp Vanilla Essence
Steps:
  1. Mix the gelatin powder and boiling water in a bowl. Keep it warm by placing over a pot of simmering water. 
  2. Using an electric beater, beat the cream cheese and  Confectioner's  sugar until smooth and creamy. 
  3. Add in vanilla essence and mix well. 
  4. Add in the gelatin mixture. Mix well. 
  5. Spread the mixture over the chilled biscuit base. 
  6. Chill it for 3 to 4 hours. 
C) Topping
  • 1 box of Jello Crystal (Strawberry Flavor) 
  • 1 cup of boiling water
  • 1 cup of cold water
  • 6 Strawberries, cut into 12 heart shapes
  1. When the cream cheese filling is chilled, prepare the jelly topping. 
  2. Lay the strawberry hearts over the cream cheese. Make sure you can get at least 12 pieces. 
  3. Stir the jello crystals into boiling water. Make sure all crystals have melted. 
  4. Add in the cold water. 
  5. Carefully pour over the cheesecake. 
  6. Chill it in the fridge and serve it in cut slices when set. 

Saturday, April 21, 2012

Yummy Coconut Cream Pie

It is Spring! Or maybe summer has decided to come early. Temperatures shot as high as 30 deg celsius in Cambridge. My sleeveless, cotton tees and skirts from Singapore can make appearance outside the wardrobe now. With such warm and dry weather,my palate is definitely craving for something cool and light! 

Someone asked me if Singapore has seasonal foods. The first things that came up to my mind were durians and mangoes. But with advanced agricultural technology and imports of foreign products, there is probably no seasonal foods anymore. Most of our foods are available all-year-round with exception of festive foods. However in temperate countries, menu changes according to seasons and weather. The coconut cream pie I made here is light, refreshing and addictive. Perfect for Spring! And one slice is never enough so prepare to indulge!


The crust is made from crushed biscuits and melted butter. It is easier to prepare and manage than a pastry dough. The custard is filled with unsweetened grated coconut and coconut milk that gives the kick of tropical flavor to the pie. 

Recipe (For one 9 inch pie) 
Ingredients:

A) Crust
  • 6 ounces of Animal Crackers (Digestive Biscuits are good too)
  • 2 tbsp Unsweetened shredded coconut
  • 1 tbsp Sugar
  • 4 tbsp Unsalted butter, melted and cooled

B) Filling
  • 400ml Coconut milk
  • 1 cup of milk (I used vanilla soy milk)
  • 1/2 cup unsweetened shredded coconut
  • 1/2 cup and 1/2 tbsp sugar
  • 3/8 tsp Salt
  • 5 Large egg yolks
  • 1/4 cup Cornstarch
  • 2 tbsp Unsalted Butter
  • 1 tsp Vanilla Extract
C) Topping
  • 1 1/2 cup cold Heavy cream
  • 2 tbsp Sugar
  • 1/2 tsp Vanilla Extract
  • 1 tbsp unsweetened shredded coconut, toasted till golden brown

Steps:
Crust
  1. Preheat oven to 325 deg Fahrenheit. Using a food processor to reduce biscuits, sugar and coconut into fine crumbs. 
  2. Transfer into a mixing bowl, add in melted butter. Mix well. 
  3. Empty the mixture to a pie pan. Using a 1/2 cup measuring cup to press crumb on the bottom and sides of pie pan. Make sure the crumb holds well. 
  4. Bake for 25 minutes or until golden brown. 
  5. Set aside to cool completely. 


Filling
  1. In a saucepan, bring coconut milk, milk, sugar, shredded coconut and salt to simmer. Keep an eye not to let milk foam. Stir to ensure 1/2 cup sugar dissolves. 
  2. In a separate mixing bowl, whisk egg yolks, cornstarch, and remaining 1 tbsp of sugar until well combined. 
  3. Slowly add in hot milk mixture into egg mixture. 1 cup at a time. Whisk well for each addition. Do not add too much into the egg mixture as it may curdle the egg. 
  4. When all milk mixture is added, return the mixture to saucepan and let it boil over medium heat. The mixture will thicken. Remove from heat when the mixture bubbles. 
  5. Add in butter and vanilla essence. Stir well.
  6. Pour filling onto the pie crust. Using a food wrap, cover the filling and refrigerate until firm. Overnight preferred. 

Topping
  1. Before serving, whisk cream, sugar and vanilla until soft peaks form. 
  2. Top pie with whippe cream and sprinkle with toasted coconut. 
  3. ENJOY!

Sunday, April 8, 2012

Old Fashioned Bread Pudding with Rum Vanilla Sauce


I never like Bread Pudding (until a month ago). One of my best friends, WWW, was the total opposite. She loves it and she would zoomed right into it if it was offered in a buffet. No matter how she tried to convince me to try it, I never did. 


I was full of assumptions that bread pudding was just stale bread drowned in eggs, milk, sugar and butter. Also I was particular about the 'nutrition' value it will bring to my concerning waist line and 'bye-bye' arms. Recently, I was offered to try in a pot luck session. I had to be polite so I tried. And I am sold completely! It was so delicious that I went for 2 and 3 helpings. As I was eating, I suggested to make a few tweaks to make the pudding even better.


Here's my version!


Recipe (Serve 4- 6 servings)
Ingredients:


A) Pudding
  • 4 cups of White Bread, cut into 2 inch squares (or any shape you like)
  • 1/2 cup Raisins 
  • 2 cups Whole milk
  • 1/4 cup Unsalted Butter
  • 1/2 cup Granulated sugar
  • 2 Large eggs
  • 1 tbsp Vanilla Essence
  • 1/2 tsp Ground Nutmeg
  • 1/4 tsp Cinnamon
  • 2 tbsp Dark Rum
Steps:
  1. Soak the raisins in rum for at least 30 minutes (overnight for best results). Drained. Set the rum aside. 
  2. Preheat the oven to 350 degree Fahrenheit. 
  3. Combine bread and raisins in a large mixing bowl. 
  4. In a medium saucepan, combine whole milk, sugar and butter. Over medium heat, melt the butter and dissolve the sugar. Do not let the milk boil. 
  5. Pour the milk mixture over the bread. 
  6. Let it stand for 10 minutes. 
  7. In a separate mixing bowl, mix other ingredients with a whisk. Stir into the bread mixture. Be gentle.
  8. Pour into a greased casserole or deep baking dish. Bake for 40 minute or until it is golden brown and set. 
  9. Remove from oven. Drizzle leftover rum over the pudding. 
B) Vanilla Sauce
  • 1/2 cup Butter
  • 1/2 cup Sugar
  • 1/2 cup Brown Sugar
  • 1/2 Heavy cream
  • 1 tbsp Vanilla essence
  • 1 tbsp Rum
Steps:
  1. Combine all ingredients except vanilla essence and rum. Cook over medium heat and stir occasionally. 
  2. When the mixture thicken and starts to boil, stir in vanilla essence and rum. 
  3. To serve, spoon warm pudding into individual plates and drizzle with warm sauce. 

Tuesday, March 20, 2012

Black Sesame Paste 黑芝麻糊

I realized I am starting to crave for the food I do not usually love or even consumed in Singapore. Is it because I am missing home or my taste buds are asking for doses of familiarity and nostalgia? It is almost seven months being away for home. I do admit that home does not seem so far after all. Technology has definitely served me well with the ability to Skype, MSN, What's App and even play games ("Draw Something") with my family and friends. However, being physically away from home means I am unable to help my mum in doing cooking, 'fight' with my brother or even carry my niece around. But looking forward, we will returning in a couple of months to a very warm place (both literally and metaphorically). Returning home would also means that I will have to return to daily routines and work. I wish work can be more forgiving to the mind and body. Or maybe it is not about work.... it is about one handles work? For a period of time, the term "Work-Life Balance" was much of a talking point by all management bodies but shortly the term was changed to "Work-Life Harmony", knowing that work and life can never be balanced. So are you in harmony with work and life? 


When I was in Singapore, I would occasionally wait for my hubby to knock off and we would go for dinner together. His work place is near Tanjong Pagar and I enjoyed walking around the area  to explore the shophouses and newly established eateries. The area offers an interesting mix of traditional chinese established businesses and "arty farty" newly mushroomed start-ups. On one of these occasions, I entered a new Chinese Dessert store and ordered a bowl of Black sesame paste. I have never order this dessert before as I understand that it is very difficult to master a good recipe and I was right.  


In my attempt to make this dessert, I aim to duplicate the texture and taste of the Black Sesame Paste. However, the aromatic flavor is still a challenge as the quality and freshness of the sesame seeds is key to an excellent bowl of Black Sesame paste. I would say I would rate this attempt a 4-star (out of 5). 


Recipe (Serves 2-3)
Ingredients:

  • 1 cup Grounded Black Sesame Seeds, toasted
  • 1/8 cup Grounded Peanuts, toasted 
  • 1/4 cup Glutinous Rice Flour
  • 1/3 cup Granulated Sugar
  • 2 cups of Water
Steps:
  1. In a wok or saucepan, fry the glutinous rice flour for about 15 minutes on low heat. This step helps to remove the uncooked flour taste. Set aside to cool.
  2. In a medium saucepan, boil 2 cups of water. 
  3. Add in grounded black sesame seeds and peanuts. Reduce the heat to low. Stir well. 
  4. Add in sugar. Taste and add more if desired. 
  5. In a bowl, mix 2 tbsp of water with the cooked glutinous rice flour. 
  6. Slowly whisk in the flour mixture into the saucepan until the sesame paste reached a thick consistency.  You can use a spoon to check if it coats the back of the spoon.
  7. Once the sesame paste boils, you may remove it from heat.  

For finer texture, you may sieve the grounded sesame seeds and peanuts before use. 

Tuesday, February 7, 2012

Panna Cotta with Berries sauce

I remember during my honeymoon trip in Italy, my hubby and I had dinner at an Italian restaurant nearby our hotel for two consecutive nights. It was a small and cozy family-run restaurant. The food was authentic, delicious and reasonably priced. On one of those nights, we had the best Panna Cotta by far. It was smooth, silky and yummy. Ever since, I want to learn to make some Panna Cotta.


Panna Cotta is a very common Italian dessert. It is very simple to make. You can make it in advanced and serve them chilled in pretty little glasses at your parties. There is a variety of accompanied sauces, flavourings or toppings which it goes well with. But today I would like to share a simple and easy-to-make recipe which gives you an idea of the creamy Italian puddings. 


Recipe (Four 3" molds)
Ingredients

  • 1 Gelatin Package, approx 1 tbsp
  • 2 1/2 cups Heavy cream
  • 1/2 cup Whole milk
  • 1/3 cup sugar
  • 1 1/2 tsp Vanilla essence (You can opt for 1/2 Vanilla pod or 1 tsp Vanilla paste)
  • 3 tbsp Cold water
  • 1/2 cup Blueberries
  • 1/2 cup Blackberries
  • 1 tbsp Honey
  • 3 tbsp Sugar
  • Mint leaves (Optional)

Steps:

  1. Mix the gelatin powder in the cold water and let it sit for 5 minutes. 
  2. In a saucepan, heat heavy cream, milk and 1/3 cup sugar over medium heat. 
  3. When it starts to boil, remove from heat and add in vanilla essence and gelatin mixture. Mix well.
  4. Divide the mixture equally among your molds. Cover and chill the puddings for at least 4 hours.  
  5. In a separate saucepan, simmer the blueberries, blackberries, honey and 3 tbsp sugar until the sauce turns to a thick consistency. Chill. 
  6. To serve, remove the Panna Cotta from the mold to a plate. Drizzle with berries sauce and top it with a mint leaf. 

Tuesday, January 31, 2012

Making Cannoli

One of the signature desserts of Boston, Northend, is none other than Cannoli. There is a couple of famous cannoli stores which both tourists and locals adore. The tube-shaped pastry originated from Sicily and evolved as it traveled to America. The pastry is fried and filled with cream so it is best eaten fresh. You can make different flavors for its filling. I particularly enjoy almonds!

Cannoli is actually pretty easy to make. It will take some time but I am sure many of you can make your own cannoli and surprise your family and friends during tea time. 

Before you jump into this, please purchase some cannoli tubes. I bought mine from Amazon. 

Recipe (20 shells)
Ingredients:

A) Shells
  • 3 cups All-purpose flour
  • 1/4 cup Sugar
  • 1/4 tsp Ground Cinnamon
  • 3 tbsp Shortening, cut into pea-sized
  • 1/8 tsp Salt
  • 1 egg
  • 1 egg yolk
  • 1/2 cup Sweet Marsala wine
  • 1 tbsp Distilled white vinegar
  • 2 tbsp Water
  • 1 Egg white 
  • Cooking oil, for deep frying
Steps:
  1. In a mixing bowl, mix the dry ingredients well.
  2. Add in shortening. Mix well.
  3. Make a well in the middle of the bowl. Add in egg, egg yolk, Marsala wine, white vinegar and water. Mix well with a spatula. 
  4. When the dough starts to forms, use hands to knead for about 10 minutes. Add some water if dough is too dry.
  5. Return the dough into the bowl. Wrap dough with cling wrap and refrigerate for 1-2 hours. 
  6. Divide the rested dough into 4. Roll each dough with a rolling stick or a pasta maker. Make it as thin as possible. Paper thin if you can. 
  7. Using a bowl or a cutter, cut rounds out from the rolled dough. Wrap a cut-out around cannoli tube and seal with egg white. Make sure it seals well.
  8. Heat oil in a deep fryer or big saucepan over medium-high heat.  
  9. Fry the cannoli until they turn golden brown. You may need to use tongs to turn the tubes to get an even colour.  
  10. Place the cooked cannoli on paper towels. Remove the cooled cannoli tubes. 
  11. Store cannoli in air tight containers and use when necessary. 

B) Filling

  • 16 ounces Ricotta Cheese
  • 1/2 cup Confectioner's sugar
  • 1/2 tsp Almond Essence  
  • Toasted Almond nuts, chopped
  • Confectioner's sugar, for dusting
Steps:
  1. Mix the ingredients well with a whisk. 
  2. Using a piping bag, pipe the filling into the shells.
  3. Sprinkle the ends with almonds. 
  4. Dust confectioner's sugar over the cannoli. 
  5. Enjoy!

Monday, January 9, 2012

Light Refreshing Citrus Tart

I love tarts. I love staring at colorful decorated tarts ... Beautifully displayed on the cooled shelves in bakeries. My eyes will be glued at the layers of fresh colorful fruits and I wish I could reach out to them and pop them right into my mouth. Yum!

As I was shopping at Burlington Mall, I walked into a kitchen store and saw a 9" fluted round tart pan printed with "MADE IN FRANCE". I liked it so much and I bought it together with another rectangular fluted tart pan. It is rather difficult to get large fluted pan with removable base in Singapore and Boston. Furthermore if you want a pan from France (Land of Pastry), rather impossible!   


This recipe reaps a nice 9" round tart pan and it tastes very refreshing and light. The choice of fruits is important as it makes up much of the taste. I love navel oranges. They are generally very sweet and juicy. Grapefruits have a bitter aftertaste but try to choose riper ones to have more sweetness to overcome the bitterness.


Recipe
Ingredients


Tart Shell

  • 1 1/4 cup Cake Flour
  • 6 tbsp butter
  • 1/4 cup and 1 tbsp Confectioners' sugar
  • 1 Large egg
  • 1 tsp Orange zest
  • Pinch of Salt
Steps:
  1. Beat butter and sugar with a mixer until it turns pale and creamy. 
  2. Add in egg and beat until well incorporated. 
  3. Add in orange zest. Mix well. 
  4. Using low speed, add in flour and salt. 
  5. Mix well. Remove dough from mixing bowl. 
  6. Wrap dough in cling wrap and chill for at least 1 hour. 
  7. Preheat the oven to 350 degree Fahrenheit. 
  8. Roll the dough on a floured surface to 3mm thick and lay it on the tart pan. 
  9. Trim and remove excess dough. Use a fork to prick the dough to prevent dough from puffing during baking. 
  10. Bake for about 30 minutes or golden brown. 
Custard
  • 1 cup Whole milk
  • 1 tsp Pure vanilla essence
  • 1/4 cup Caster sugar 
  • 2 Large yolks
  • 2 tbsp Corn starch
  • 1 tbsp Unsalted butter
Steps:
  1. Mix milk, vanilla, 2 tbsp of sugar in a saucepan. 
  2. Bring to simmer.
  3. Whisk egg yolks, cornstarch and remaining sugar in a mixing bowl. 
  4. Slowly add the milk mixture into egg. Do not add all at one time as eggs will curdle.
  5. Add the mixture back to the saucepan and bring to simmer over medium heat. 
  6. Stir continuously until mixture thickens. 
  7.  Transfer to a clean mixing bowl.
  8. Stir in butter. 
  9. Cover the custard with a cling wrap. Chill for 2 hours. 
Fruits Topping and Assembly
  • 2 Large Navel Oranges
  • 2 Large Grapefruits
Steps:
  1. Using a fruit knife, cut the skin off the fruit. 
  2. Cut the fruit into segments. Use the natural segments of fruits as a guide. 
  3. Drain the fruit segments with a colander. 
  4. Spread the custard on the tart shell. 
  5. Arrange the fruit segments on the custard in a circular pattern. You may want to start with a darker color on the edge of the tart. 
  6. Serve cold. 


Sunday, December 25, 2011

Guest Post for Whickit Blog: Bubur Cha Cha

Merry Christmas everyone! This year has been one of the most satisfying for me. To be able to immerse in a different country has been the most exciting. I am very privileged to be involved in the local community in different ways. This has helped me to blend in quickly. 

In my participation in food swap, I met Salina, a wonderful lady from Whickit. I am glad to be invited by her to write a guest post on Whickit Blog to share something from Singapore. 


This is 'Bubur Cha Cha' a popular and street dessert made from sweet potatoes, yam and sago in coconut cream. 

Please visit Whickit Blog find out more about my guest post and this recipe!

Tuesday, December 13, 2011

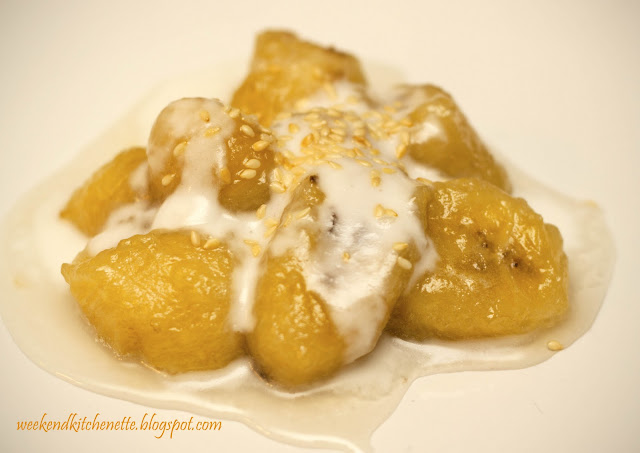
Sweet Bananas in Coconut Cream with Toasted Sesame seeds

I was planning for a Thai Cooking Challenge for my Culinary club. The menu looks good except that it needs a dessert!! I needed something that is easy and quick. But most importantly easy on the palate because we have international friends in the club who might not be able to take exotic Asian taste. 


After browsing Sam and Forest Leong latest recipe book, I saw something I like, "Bananas in Coconut cream". Perfect! I had some bananas which I just bought so I quickly tried out the recipe. Mmm... Mmm! The bananas are sweet and soft. And the coconut cream adds a layer of creaminess and a tint of saltiness which that enhances the entire gastronomic experience. My hubby then said,"How about some toasted sesame seeds to go with it!" That is a marvelous idea. We tried that and it was really a brilliant suggestion. 


I have used large bananas to try this recipe. I sliced them equally before cooking so to make cooking more manageable. I suggest that if you can get hold of small bananas, use them as they look more presentable. 


I hope this recipe will work out well for the coming Thai Cooking Challenge. It will be so much fun!


Recipe (Serves 5) 
Ingredients
  • 150ml Coconut Cream
  • 1/4 tsp Salt
  • 400g Sugar
  • 200ml Water
  • 10 - 20 Small bananas, peeled and soaked in water with 1 tbsp lime/lemon juice for at least 15 minutes
  • 1 tbsp of toasted Sesame seeds

 Steps
  1. Toast sesame seeds on a pan over low heat. Remove when they turn light golden brown. Set aside.
  2. Prepare sauce. Mix coconut cream with salt and boil over medium heat for about 5 minutes. Remove from heat and set aside.
  3. Boil sugar and water over high heat until sugar dissolves. When syrup starts to thicken, turns heat to low.
  4. Drain the bananas and add to the syrup. Cook, stirring occasionally, until bananas start to become translucent, about 10 -15 minutes. Do so gently to prevent bananas from breaking.
  5. Drain bananas from syrup and top with coconut sauce. Sprinkle with some sesame seeds.
  6. Serve immediately.

Saturday, December 3, 2011

Poached Bosc Pears in Red wine

Back in the olden days, Romans cultivated pears and only eat them cooked. They would stew them with honey. Then slowly people moved to enjoy pears stewed in wine and spices. But presently we enjoy pears in many ways: fresh, canned, juiced and dried. 


Hmm.. I think pears is an under-rated fruit. Why? Perhaps it does not have a distinct taste and not delicious when unripe (which is most of the cases when bought from the supermarket). I enjoy eating ripe and soft pears as they are extremely juicy and sweet. But it always seems so difficult to get pears to ripe. But do you know that the trick is to place pears in room temperature and put them next to bananas. I think there must be some chemical reaction between the two. 


The funny thing is that no one should associate your gal friends to a pear (even though you think she does look like one). Women hate to have pear-shaped body, small at the top and heavy at the bottom. 


This dessert which I am sharing requires pears which are hard and unripe as it has to be stewed in red wine for some time. Bosc pears are best for this as they are denser and firmer. So if you have ripe and soft pears, please just savor it fresh as it is.  


Recipe (Serves 3-4)
Ingredients

  • 2 Bosc Pears (Halved and cored)
  • Half a bottle of red wine 
  • Half a lemon, juiced
  • 1/2 cup of Sugar
  • 1 tsp Vanilla extract
  • 1 small Cinnamon stick
  • Half a Star anise
Steps:
  1. Prepare the pears. 
  2. In a saucepan, lay the pears flat and add in wine. Ensure that the pears are submerged. 
  3. Add in the rest of the ingredients. 
  4. Bring the wine to boil and reduce the heat to a simmer. 
  5. Cook the pears till tender. Use a toothpick to test. Takes about 30 minutes.
  6. Remove pears and put aside. 
  7. Boil the rest of the liquid and reduce to a thick glaze. 
  8. To serve, drizzle the pears with glaze. Ice-cream is optional. 

Tuesday, November 15, 2011

Pillowlike Cream Puffs

Everyone has a sweet tooth. One day after our dinner at home, my hubby asked "What's for dessert?" You should see the blank look on my face... Well, it didn't occurred to me that I missed out dessert! From that point, I realized that a complete meal is best to end with a sweet note. Yes, a dessert!


This week, I am conducting a baking class for a group of passionate and enthusiastic spouses/ partners of MIT students/ staff. After brainstorming, I think I will share something sweet so that they can end their dinner on a sweet note for their loved ones at home. Cream puff, it shall be!


Recipes (For 40 mini puffs)
Ingredients:

  • 1 cup water
  •   ½ cup butter
  • 1 cup Flour
  • 4 eggs


Steps:
1.      Preheat oven to 400°F.
2.      Heat water and butter to rolling boil in a saucepan.
3.      Stir in flour.
4.      Stir vigorously over low heat until mixture forms a ball, about 1 minute.
5.      Remove from heat.
6.      Cool for 10 minutes.
7.      Beat in eggs, all at once.
8.      Continue beating until smooth.
9.      Drop dough by scant 1 tbsp , leaving 2 inches apart onto cookie sheet.
10.   Bake until puffed and golden, about 25 minutes.
11.   Remove and let it cool.
12.   Cut off tops and pull out the filament of soft dough. Fill puffs with custard or ice-cream.
13.   Serve with chocolate fudge or dusted confectioners’ sugar.

 I used the custard which I featured previously in my "Puffs with Fresh Custard and Raspberries".